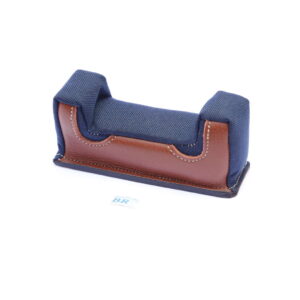
Description
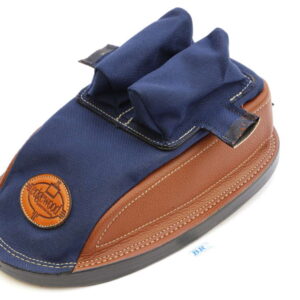
Edgewood – Edgebag Minigater – Standard Height (Black)
Extra rigid, super flat bag base made with a unique material resists deformation over time
“Overlay Ears” – Whether you choose slick material or cordura, a durable layer of leather is added underneath the material which contributes to consistency in shape and performance as well as extreme longevity and resistance to wear.
Flatter ear space means the riding surface at the base of the ears has been redesigned to practically eliminate inconsistencies in the transition between the riding surface and the ear base. This remedies any potential drag or grabbing and increases longevity by removing an inherent wear point.
Reinforced ear base isolates the ear set from the shape of the bag, contributing to consistency in the contact surface and ear spread.
Embroidered cordura top.
Specs: Bag height 76-83mm STD
Ear height 48mm
Ear spread 13mm or 19mm
Base 270mm x 170mm (Minigater size)
Filling Instructions
For both front and rear bags, you will start by looking for the nylon/cordura flap. This flap will have white stiches running along both sides. Note that the flap is actually two pieces of nylon/cordura which are sewn together. These two pieces must be separated at the end where there are no stitches in order to insert a funnel or other filling device.
For Rear Bags it is advisable to fill the ears first, then after you have tucked the flaps in continue filling the base of the bag.
Hold the bag so that the flap is pointed straight up and fill half way. Using a blunted rod and alternating between filling and packing, begin packing the sand firmly into the bag until the shape is uniform and you are satisfied with the firmness. Slam the base of the bag firmly on the bench several times to compact and evenly seat the sand. Then, check to see if more sand needs to be added. Repeat this process for the ears if you are filling a rear bag. Note that as the sand continues to condense during use, the bag may occasionally require additional sand until it reaches maximum capacity.
When you are done filling:
*Rear Bags-
Tuck the flap into the slot directly underneath itself by creating a “U” shape with the flap and pushing it into the slot. The flap has a built-in tab which makes it easy to insert a blunt tool as an aid to push the flap into the slot. (also applies to the ears).
*Front Bags-
Simply tuck the flap under the bag and insert it into your rest. You may apply a small, thin piece of tape to hold the flap in place under the bag.
TROUBLESHOOTINGIf you find, after filling your bag or after the sand has settled, that your bag bulges on the bottom or rocks when on the bench try the following: Bang the bag flat down on the bench then gently slide it into place. Slapping the bag firmly onto the bench shifts the sand back up into the body of the bag and flattens the base of the bag. By pushing – rather than lifting – the bag into place, the bag will maintain that flat base.
You may also find that using one of our Dead Bottoms or Spacer bag will help to correct the bottom “bulge” and create a flat surface to stabilize the bag. Note that the dead bottom will raise the bag approximately 3/4″.